 Throughout this troubleshooting series, in nearly every topic discussed, the answer led to performing a leak check on the Purge and Trap (P&T). This part of the series will go over the preventative maintenance program and understanding the leak check troubleshooting tool in Teklink, the Teledyne Tekmar P&T software.
This is the fifth in our Troubleshooting series for VOC Analysis.
- Part one is linked here, VOC Analysis Troubleshooting Part 1: How to Begin Troubleshooting
- Part two is linked here, Troubleshooting Part 2: No or low analyte response and carryover
- Part three is linked here: Elusion Issues and Moisture Control
- Part four is linked here: Linearity and Reproducibility Issues
A carefully designed and faithfully executed preventative maintenance program is the best method for maintaining your instrument. It will help maintain the performance standards of the unit and decrease the possibility of down time. We suggest that you run a leak check after changing the Internal Standard (IS) in the IS vessel, foam eliminator vessel, any glassware, or trap;, any time you change a part on the instrument; after turning the system back on after it’s off for a while, such as after a holiday break; and before performing a benchmark test, because you want a leak-tight system for that.
There are warning signs that you have a leak in your system:
- If you see a steady or drastic drop in purge and bake pressures when you review them in the TekLink history Log.
- If you are missing or have lower than usual responses from front end compounds, such as the gases. This can be especially true in a soil method sample if the vial cap is not on tight enough.
- If the linearity and reproducibility are failing, you could have a leaky drain valve, which could lead to too much rinse water in the sparger and not enough sample.
- If the sparger is draining slowly, you could have a massive leak.
- If there are low to no sparge vessel bubbles while purging, it could be an indication of a leak.
- If your purge and trap is interfaced to a gas chromatograph (GC) that has a pneumatic inlet with pressure or flow that is electronically controlled, it will alert you during desorb. That means there is a leak in the trap.
It’s good to have a leak detector handy before starting the system leak check, especially if using helium as the purge gas. A leak detector can be extremely helpful in tracking down the leak faster.
Following is a walk-through of the Teledyne Tekmar Atomx XYZ combined P&T and autosampler, which has a complex flow and sample pathway with multiple areas where a leak could occur.
On the Main TekLink screen hit Tools and in Tools select Leak Check (see Figure 1). You will be directed to place a new, sealed, empty vial in autosampler position one. It is especially important that the septum has not been punctured previously and the vial lid is sealed tight. A loose seal would cause a failure in the leak check. Hit Yes when the vial is in position one to start the automated leak check (see Figure 2).
Figure 1: Leak Check in the Tools menu of the TekLink software
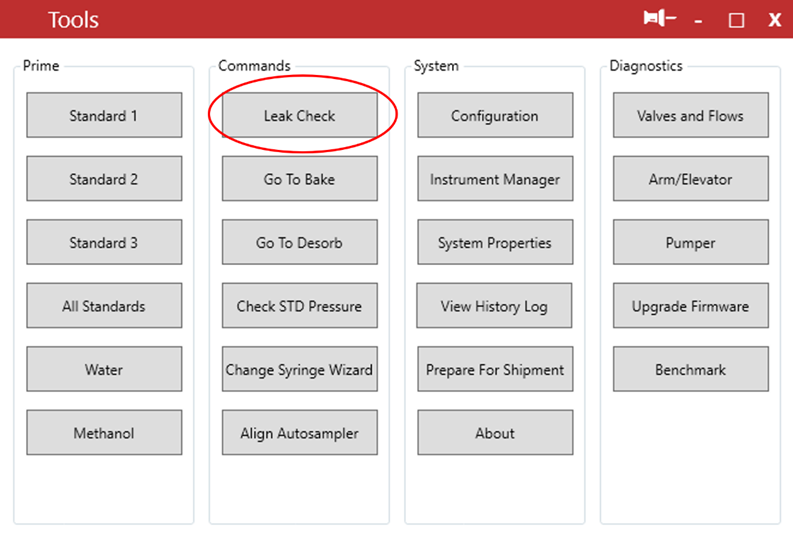
Figure 2: Automated system Leak Check tool
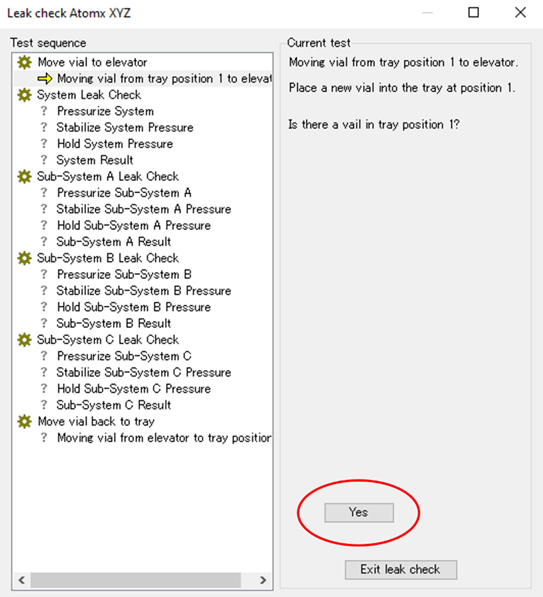
The Mass Flow Controller (MFC) is bringing in enough flow to pressurize the entire system to 27 pounds per square inch (PSI) at 200 milliliter per minute (mL/min). When it reaches the set point, it shuts off the MFC and closes off exhaust ports like the vent valve and drain valve. It will spend about two minutes trying to pressurize the system. If it cannot pressurize the system, the leak check will fail and there is probably a massive leak, or the vial cap is not on tight enough.
If you have a 25 mL sparger, you will need to go into Configuration in the Tools menu and add more time to pressurize the system, because with a larger volume sparger, it is going to take longer to pressurize that to 27 PSI. This will stabilize the pressure for a short amount of time. It will hold that stabilized pressure for about 30 seconds. If the delta stays within one, then the leak check passes. You can change the delta in the Configuration also, but it is best not to make this larger than one. You can create stricter requirements for passing if needed.
If the overall system leak check fails, the subsystem A leak check starts. Subsystem A checks if there is a leak in the mass flow controller, bake valve, purge valve, purge select valve, syringe valve, or pressurized valve. If subsystem A passes, the system is vented and re-pressurized to begin checking subsystem B. This test will check subsystem A, but also includes the 6-port syringe valve, also called the 7-port valve. It is right above the syringe, needle fittings, and soil valve connections. If subsystem B passes, the system is vented again and re-pressurized to begin a check of subsystem C. This is a cumulative test, which includes subsystem A and subsystem B, but also includes the sparge vessel, the 6-port valve, sample mount, drain valve, and vent valve. If all subsystems pass the leak check and the entire system continues to fail, the leak could be in the following areas:
- Loose fittings in the 6-port valve or a potential cross-port leak in 6-port valve
- Trap fittings
- MCS fittings
The Teledyne Tekmar Lumin P&T also has a system leak check, but it has a much less complex flow and sample pathway because it is a waters only P&T system.
I know tracking down a leak can seem very daunting, but hopefully this walk-through helped you understand the process behind the leak check diagnostic tool a little better, and the next time you have a leak it is easier to fix.
Please continue to follow this series. Next, we will cover the TekLink troubleshooting tool benchmark test.
- Part one is linked here, VOC Analysis Troubleshooting Part 1: How to Begin Troubleshooting
- Part two is linked here, Troubleshooting Part 2: No or low analyte response and carryover
- Part three is linked here, Troubleshooting Part 3: Elution issues and moisture control
- Part four is linked here, Troubleshooting Part 4: Linearity and reproducibility issues
For more information, click the button below.